Download our e-book of Introduction To Python
Related Blog
Matplotlib - Subplot2grid() FunctionDiscuss Microsoft Cognitive ToolkitMatplotlib - Working with ImagesMatplotlib - PyLab moduleMatplotlib - Working With TextMatplotlib - Setting Ticks and Tick LabelsCNTK - Creating First Neural NetworkMatplotlib - MultiplotsMatplotlib - Quiver PlotPython - Chunks and Chinks View More
Top Discussion
How can I write Python code to change a date string from "mm/dd/yy hh: mm" format to "YYYY-MM-DD HH: mm" format? Which sorting technique is used by sort() and sorted() functions of python? How to use Enum in python? Can you please help me with this error? I was just selecting some random columns from the diabetes dataset of sklearn. Decision tree is a classification algo...How can it be applied to load diabetes dataset which has DV continuous Objects in Python are mutable or immutable? How can unclassified data in a dataset be effectively managed when utilizing a decision tree-based classification model in Python? How to leave/exit/deactivate a Python virtualenvironment Join Discussion
Top Courses
Webinars
A Social Distancing Detector

Mahesh Pardeshi
2 years ago
A quarantine project combining
deep learning and computer vision.
Table of Contents
1.Model selection
2.People detection
3.Bird eye view transformation
4.Social distancing measurement
5. Results and improvements
During the quarantine I was spending time on how to figure out is people
maintaining social distancing or not analysis. While doing this, I trained
object detection models with performance and speed indicators. Having some
knowledge in computer vision and given the actual context, I thought it could
be interesting to use one of these to build a social distancing application.
One of these included performing a bird eye view transformation of a
picture. A bird eye view is a basically a top-down representation of
a scene. It is a task often performed when building applications for automatic
car driving.
This made me realize that applying such technique on a scene where we
want to monitor social distancing could improve the quality of it. This article
represents how I used a deep learning model along with some knowledge
in computer vision to build a robust social distancing detector.
This article is going to be structured as follow:
1.Model selection
2.People detection
3.Bird eye view transformation
4.Social distancing measurement
5.Results and improvements
1. Model selection
For
this we prepared one dataset which contains 120,000 images with a total 880,000
labelled objects in these images. These models are trained to detect the 90
different types of objects labelled
in this dataset. This list of objects includes a car, a toothbrush, a banana
and of course a person.
They have different performances
depending on the speed of the model. I made a few tests in order to determine
how to leverage the quality of the model depending on the speed of the
predictions. Since the goal of this application was not to be able to perform
real time analysis, So I choose 28 objects out of it (detector performance on a
validation set), which is quite strong, and an execution speed of 58 ms.
2. People detection
To
use such model, in order to detect persons, there are a few steps that have to
be done:
o Load the file containing the model into a tensorflow
graph. and define the outputs you want to get from the model.
o For each frame, pass the image through the graph in
order to get the desired outputs.
o Filter out the weak predictions and objects that do not
need to be detected.
Load
and start the model
The
way tensorflow models have been designed to work is by using graphs.
The first step implies loading the model into a tensorflow graph. This graph
will contain the different operations that will be done in order to get the
desired detections. The next step is creating a session which is
an entity responsible of executing the operations defined in the previous
graph. I decided to implement a class to keep all the data related to the
tensorflow graph together.
class Model:

Class that contains the model and all its functions

"""

def __init__(self, model_path):

"""

Initialization function

@ model_path : path to the model

"""

# Declare detection graph

self.detection_graph = tf.Graph()

# Load the model into the tensorflow graph
with self.detection_graph.as_default():
        od_graph_def =
tf.compat.v1.GraphDef()

with tf.io.gfile.GFile(model_path, 'rb') as file:
     serialized_graph = file.read()

od_graph_def.ParseFromString(serialized_graph)
tf.import_graph_def(od_graph_def, name='')

# Create a session from the detection graph
self.sess = tf.compat.v1.Session(graph=self.detection_graph)
def predict(self,img):

"""

Get the predicition results on 1 frame
@ img : our img vector

"""

# Expand dimensions since the model expects images to have shape: [1, none, none, 3]

img_exp = np.expand_dims(img, axis=0)

# Pass the inputs and outputs to the session to get the results
(boxes, scores, classes) = self.sess.run([self.detection_graph.get_tensor_by_name('detection_boxes:0'),
self.detection_graph.get_tensor_by_name('detection_scores:0'), self.detection_graph.get_tensor_by_name('detection_classes:0')],feed_dict={self.detection_graph.get_tensor_by_name('image_tensor:0'):
img_exp})

return (boxes, scores, classes)
Pass every frame through the model
A new session is started for every frame that needs
processing. This is done by calling the run() function. Some parameters have
to be specified when doing so. These include the type of input that the model
requires and which outputs we want to get back from it. In our case the outputs
needed are the following:
o
Bounding boxes coordinates of
each object
o
The confidence of
each prediction (0 to 1)
o
Class of the prediction (0
to 90)
Filter out weak predictions and non-relevant objects
One of the many
classes detected by the model is a person. The class associated to a person is
1.
In order to exclude
both weak predictions (threshold: 0.75) and all other classes of objects except
from person, I used an if statement combining both conditions to exclude any
other object from further computation.
if int(classes[i]) == 1 and scores[i] > 0.75
But since these
models are already pre-trained, it is not possible for them to only detect this
class. Therefore, these models take quite a long time to run because
they try to identify all the 90 different type of objects in the scene.
3. Bird eye view transformation
As
explained in the introduction, performing a bird eye view transformation gives
us a top view of a scene. OpenCV has great
built-in functions to apply this method to an image in order to transform an
image taken from a perspective point of view to a top view of this image. I
used a tutorial to understand how to do this.
The
first step involves selecting 4 points on the original image that are going to
be the corner points of the plan which is going to be transformed. This points
have to form a rectangle with at least 2 opposite sides being parallel. If this
is not done, the proportions will not be the same when the transformation
happens. I have implemented a script available in my repository which
uses the setMouseCallback() function
of OpenCV to get these coordinates. The function that computes the
transformation matrix also requires the dimension of the image which are
computed using the image.shape propriety of an image.
width, height, _ = image.shape
This
returns the width, the height and other non-relevant colour pixel values. Let’s
see the how they are used to compute the transformation matrix:
def compute_perspective_transform(corner_points,width,height,image):

"""
Compute the transformation matrix

        @corner_points : 4 corner points selected from the image

        @height, width : size of the image

        return : transformation matrix and the transformed image

"""

        #Create an array out of the 4 corner points

        corner_points_array = np.float32(corner_points)

        #Create an array with the parameters (the dimensions) required to build the matrix

        img_params = np.float32([[0,0],[width,0],[0,height],[width,height]])

        # Compute and return the transformation matrix

        matrix = cv2.getPerspectiveTransform(corner_points_array,img_params)

        img_transformed = cv2.warpPerspective(image,matrix,(width,height))

        return matrix,img_transformed
Note that I chose to also return the matrix because it will be used in
the next step to compute the new coordinates of each person detected. The
result of this are the “GPS” coordinates of each person in the frame.
It is far more accurate to use these than use the original ground
points, because in a perspective view, the distance is not the same when people
are in different plans, not at the same distance from the camera. Compared to
using the points in the original frame, this could improve the social
distancing measurement a lot.
For each person detected, the 2 points that are needed to build a
bounding box a returned. The points are the top left corner of the box and the
bottom right corner. From these, I computed the centroid of the box by
getting the middle point between them. Using this result, I calculated the
coordinates of the point located at the bottom centre of the box. In my
opinion, this point, which I refer to as the ground point, is the best
representation of the coordinate of a person in an image.
Then I used the transformation matrix to compute the transformed
coordinates for each ground point detected. This is done on each frame, using
the cv2.perspectiveTransform(), after having detected the person in it.
This is how I implemented this task:
def compute_point_perspective_transformation(matrix,list_downoids):

"""
Apply the perspective transformation to every ground point which have been
detected on the main frame.

        @matrix : the 3x3 matrix

        @list_downoids : list that contains the points to transform

        return: list containing all the new points

 """

        #Compute the new coordinates of our points

        list_points_to_detect= np.float32(list_downoids).reshape(-1, 1, 2)

        transformed_points= cv2.perspectiveTransform(list_points_to_detect, matrix)

        #Loop over the points and add them to the list that will be returned

        transformed_points_list= list()

        for i in range(0,transformed_points.shape[0]):

                  transformed_points_list.append([transformed_points[i][0][0],transformed_points[i][0][1]])

        return transformed_points_list
4. Measuring social distancing
After calling this
function on each frame, a list containing all the new transformed points is
returned. From this list I had to compute the distance between each pair of
points. I used the function combinations() from the itertools library which allows to get every possible
combination in a list without keeping doubles. This is very well explained on this stack overflow issue. The rest
is simple math: the distance between two points is easy to do in python using
the math.sqrt() function. The
threshold chosen was 120 pixels, because it is approximatively equal to 2 feet
in our scene.
# Check if 2 or more people have been detected (otherwise no need to detect)
  if len(transformed_downoids) >= 2:
    # Iterate over every possible 2 by 2 between the points combinations
    list_indexes = list(itertools.combinations(range(len(transformed_downoids)), 2))
    for i,pair in enumerate(itertools.combinations(transformed_downoids, r=2)):
      # Check if the distance between each combination of points is less than the minimum distance chosen
      if math.sqrt( (pair[0][0] - pair[1][0])**2 + (pair[0][1] - pair[1][1])**2 ) < int(distance_minimum):
        # Change the colors of the points that are too close from each other to red
        change_color_topview(pair)
        # Get the equivalent indexes of these points in the original frame and change the color to red
        index_pt1 = list_indexes[i][0]
        index_pt2 = list_indexes[i][1]
        change_color_originalframe(index_pt1,index_pt2)
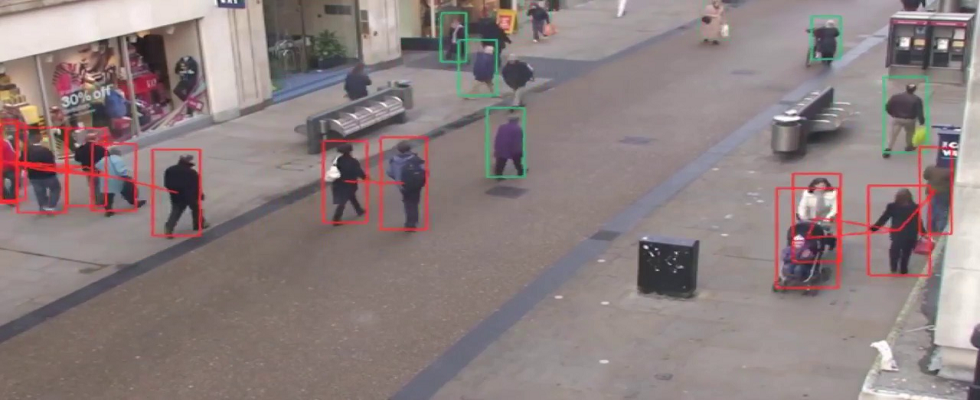
Once 2 points are identified being too close from one
another, the colour of the circle marking the point is changed from green to
red and same for the bounding box on the original frame.
5. Results
Let
me resume how this project works :
1.
First
get the 4 corner points of the plan and apply the perspective transformation to
get a bird view of this plan and save the transformation matrix.
2.
Get
the bounding box for each person detected in the original frame.
3.
Compute
the lowest point of this box. It is the point located between both feet.
4.
Use
the transformation matrix to each of theses points to get the real “GPS”
coordinates of each person.
5.
Use itertools.combinations() to measure
the distance from every points to all the other ones in the frame.
6.
If
a social distancing violation is detected, change the color of the bounding box
to red.
I used a video which consists of multisensor sequences
containing different crowd activities. It was originally build for tasks like
person counting and density estimation in crowds. I decided to use video from
the 1st angle because it was the widest one, with the best view of the scene.
Like the Blog, then Share it with your friends and colleagues to make this AI community stronger.
To learn more about nuances of Artificial Intelligence, Python Programming, Deep Learning, Data Science and Machine Learning, visit our insideAIML blog page.
Keep Learning. Keep Growing.